Synchronising SharePoint Document Metadata
Data Sync can be used to manage SharePoint documents and their corresponding metadata columns or just the metadata columns. The following page will run through a quick synopsis of how you can update just the metadata columns without updating the document content.

Requirements
Before getting started you will need to ensure that you have the following:
- Windows 10 or Windows Server
- Downloaded & Installed Data Synchronisation Studio
- Have access to SharePoint Online Document Library
- Have a document containing your metadata (CSV, XLSX etc)
Updating Metadata Columns Only
Data Sync can be used to target just the Metadata columns within SharePoint if you do not have documents to add and do not want to change the documents within your SharePoint document library.
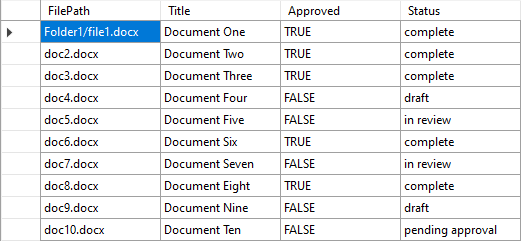
To do this you will have a document containing the metadata you want to add. This can be a CSV file or an Excel Spreadsheet for example.

You need to start by opening Data Sync and connecting to this data as your source. For this example we have a CSV file so we will use the CSV file connector.
Connect your source to your CSV file by dragging your file from file explorer onto the source window, or by clicking onto Connect Datasource in the target window and going to Text Files > CSV File. Browse for the file by clicking onto the ellipsis in the FileName field.
Then connect your target (Data Source B) to your SharePoint Document Library. In Data Sync click the Connect DataSource link in the target window to open the connection window. Then choose the SharePoint Online connector under the Microsoft SharePoint category.
Enter the URL to your SharePoint Site, this the URL to the root of your site. Examples of how your URL might look depends on if you are connecting to a subsite, subsite of a subsite or the main SharePoint site.
https://company.sharepoint.com/https://company.sharepoint.com/subsitehttps://company.sharepoint.com/subsite/subsite2
Then choose the Authentication Method to connect to your SharePoint Site. Choosing the default Simego OAuth Application will use a pre-registered multi-tenant Azure AD Oauth2 Application to connect to your SharePoint Online instance.
You can learn more about supported authentication methods in our documentation.
You cannot write to the Modified Date Column in SharePoint using the default OAuth connection. To do this you will need to use the Custom App Authentication method and add the permission AllSites.FullControl.
Now click the Authorize Connection button, this will open your default browser and ask you to sign in to Azure AD and grant access to allow Data Sync to connect to your SharePoint instance.
Once the Authorization is complete go back to Data Sync and choose your SharePoint document library from the list and click Connect & Create Library Connection. Give the connection a name and click OK.
This will add a connection to your SharePoint site in the connection library so that you can quickly access all the lists and libraries in the future. You only need to save the connection to each SharePoint site once, as you can access all lists and libraries within that site from the connection library.
Map your Columns to the Schema Map
Once you have connected you need to make sure that all the columns you need are mapped to the schema map.
You need to ensure that a key column is defined, this needs to be unique and be able to be used to identify each record. One example is using the FilePath which should be mapped to URLPath in SharePoint. There will only be one file with that name at the location specified, so this works for identifying a unique record.

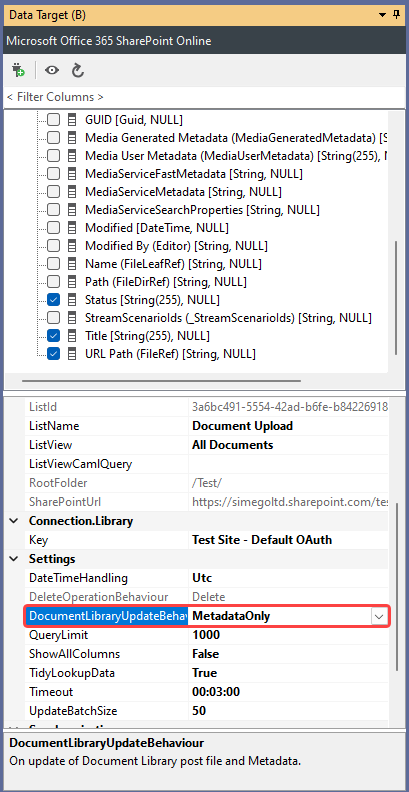
As we are only updating the metadata columns we need to edit the connection property on the target (SharePoint) side. Below the columns window look for the property DocumentLibraryUpdateBehaviour and set this to be MetadataOnly.

Run the Compare and Sync
Once the schema map has been configured you need to click onto the Run Compare button to run the comparison.
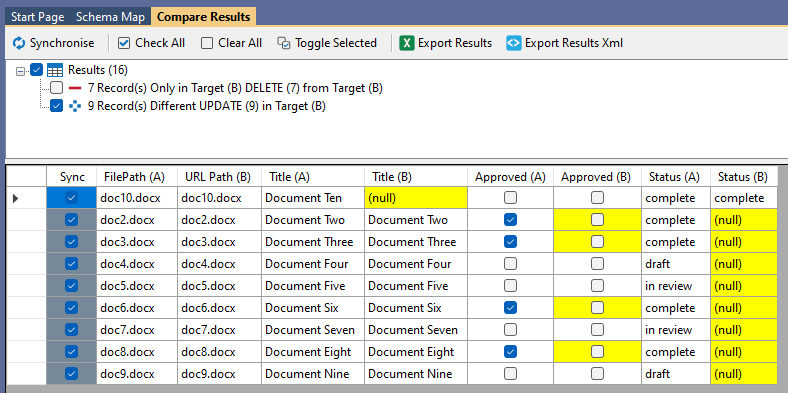
In the comparison results for this example we have 9 records to update the metadata for and 7 records to be deleted as they are not present in the source data. However as deletes are disabled by default they will not be applied in the synchronisation. To enable deletes set the EnableDelete property to True in the target window.
If you click onto the results you can preview the changes to be applied to SharePoint.

Then click Synchronise and Start to begin the sync. This will apply the changes to SharePoint, and the sync is complete.
Updating Documents and Metadata Columns
If you need to add documents and update the metadata at the same time you can use any of the connectors available in Data Sync. Some of the more frequently used options are to use an Excel file or to perform a lookup to get the metadata records.
To use Excel to upload documents and their metadata, we have the whole process listed in our other blog post on bulk uploading documents to SharePoint. Just add the columns you need from your Excel file and make sure to map them to the correct corresponding column in SharePoint.
To add metadata columns from a CSV file you would first connect to the file system where the documents are located, and then do a lookup into the CSV to get your metadata columns. Add these to the schema map, compare and sync the results. We have a guide on adding documents into SharePoint and using a lookup to get the metadata and set the folder location for each document here.
You can follow this same process with any other provider such as SQL Server, Dynamics, Salesforce etc. Just connect to your source data with the relevant connector and connect to your SharePoint Document Library. Then map the columns from your source to the target and make sure to set a key column. Finally just compare the two datasets, preview the results and sync.