CSV File
There are multiple ways you might want to use CSV files in your Data Sync projects. These can range from being a source dataset, target dataset, exporting results to a CSV file or even creating a new CSV file based off the source schema to synchronise into.
Connecting
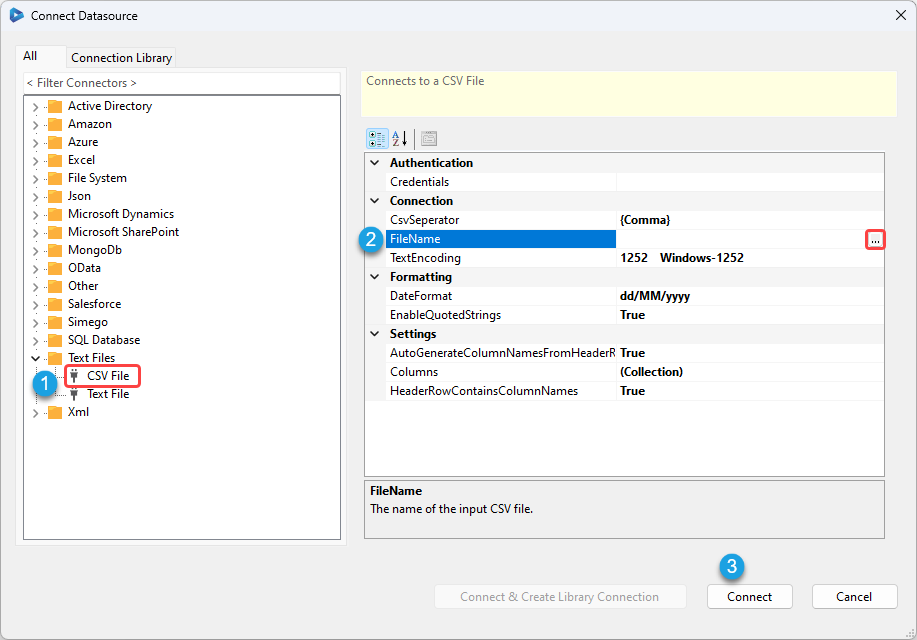
To connect to a CSV File open the connection window and expand the Text Files folder, then select the CSV File option.

You can drag a file from your Desktop/Explorer into the Data Source window to connect automatically.
Properties
Authentication
Specifies network credentials when using Web URL to load the CSV file via HTTP.
CsvSeparator
The field separator to use, you can select one from the predefined list or enter your own character.
FileName
The Path and Filename to the CSV File, without a Path the current directory is used.
Supports wild cards so *.csv would force Data Sync to load all CSV files in the directory. Each file must be of the same schema for this to work correctly. Can also be used when the CSV Filename changes to automatically pickup a file in a directory.
Supports a Web Uri to load the CSV file from an HTTP Source i.e. http://yourserver/reportdata?format=csv the Authentication settings are used with a Web Uri.
TextEncoding
The Text Encoding scheme to use UTF8 includes BOM
DateFormat
The Date Format String to use with columns of type DateTime this will be used to parse the value into a DateTime value and used to write the DateTime value to the output CSV file.
EnableQuotedStrings
Defines whether String values are Quoted in Double Quotes (").
AutoGenerateColumnNamesFromHeaderRow
Defines whether the schema columns will be automatically created from the Header row.
Columns
Defines the list of Columns when there is no header row. All columns must be defined to successfully read the file.
HeaderRowContainsColumnNames
Defines whether there is a header row in the file containing the Column names.
Create a New CSV file as the Target
Using the Tools menu you can quickly create a CSV target based off the columns added to the schema map.
To do this add the columns you want to be included to your schema map.

Then open the Tools menu and select Create CSV.
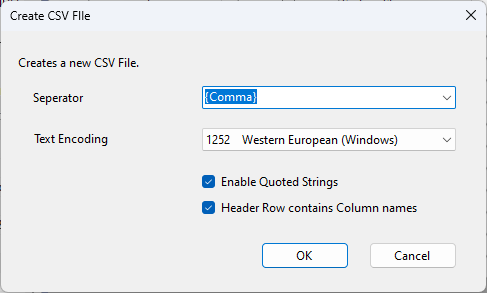
Choose the separator that should be used e.g. Comma, tab, semi-colon, pipe etc. And change the text encoding if this should be different. You can also choose to enable quoted strings and if the header row should contain the column names. By default these are set to true.

After clicking OK you will then be directed to define the file name and the location the file should be saved to. Once this has been done the blank CSV file will be loaded into the target window with the columns that were found in the schema map.
Using Project Automation
The code below shows an example of how you can create a default csv from the headers in your project using semi-colons and give it a filename of today. This requires the target to be mapped to a CSV file but will create the file on the run of the project.
public override void Start()
    {
        DataSourceB.FileName = string.Format("C:\\Users\\User\\Downloads\\MyExport-{0:yyyy-MM-dd}.csv", DateTime.Today);
    }
This creates a CSV file with the name MyExport-{Today'sDate} inserting the date today. If the CSV file doesn't exist then the a new file will be created. If there are no rows in the source and the file does not exist then it will not create a new file.