Add Active Directory Attributes to the Schema Map
The following page will cover how to add additional attributes from Active Directory that are not included by default.
The way to so this is via the Attributes Collection Editor, which contains all the Active Directory Attributes that the connection will return. The connection includes a default set of properties and you can extend this list with other available Active Directory Attributes.
Add an Attribute
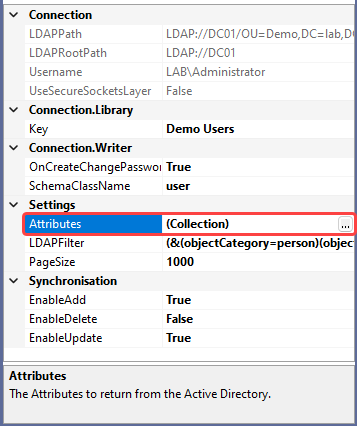
You can add attributes to your schema by going to the connection properties window below the columns and finding Attributes.
Click onto the ellipsis (...) to open the attribute collection manager.

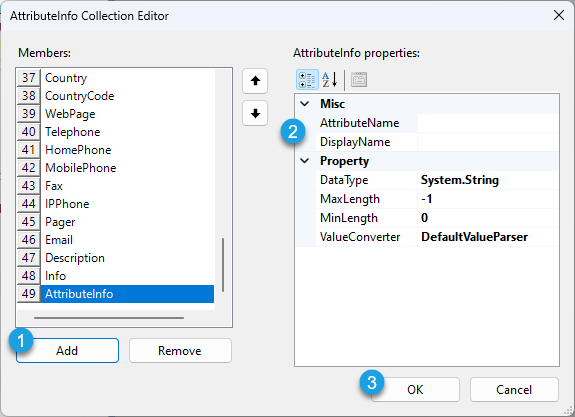
Once the collection editor window is open click Add to add a new attribute. Then complete the fields with the attribute details and click OK to save the attribute.

The table below covers in more detail what is required for each property. If you are not sure of the underlying name of the attribute in Active Directory then we recommend using ADSI Edit to find this out.
| Property | Description | Example |
|---|---|---|
| AttributeName | The name of the attribute in Active Directory | userprincipalname |
| DisplayName | The name you want to represent this attribute | Logon Name |
| DataType | The DataType of the Attribute | System.String |
| MaxLength | The maximum length of the Attribute (returned by AD after refresh) | 255 |
| MinLength | The maximum length of the Attribute (returned by AD after refresh) | 0 |
| ValueConverter | Select the converter to use to convert the value returned into the value you need | DateTimeParser |
Refresh Data Source
Once you have added your attribute to the collection you will need to refresh your Data Source by clicking the refresh button in the target toolbar. This will load the attribute as another column and you can use this within your schema map as required.