Graph API
Microsoft Graph API enables you to access Microsoft systems that may otherwise have been difficult to connect to such as Azure and Office applications (SharePoint, Exchange etc.) Below you will see a walk through of how to setup the graph API and then connect to your desired source in Data Sync.
Using the OData connector with Graph API we can connect to Azure AD. To do this we have a few things we need to setup first.
Create the App in Azure
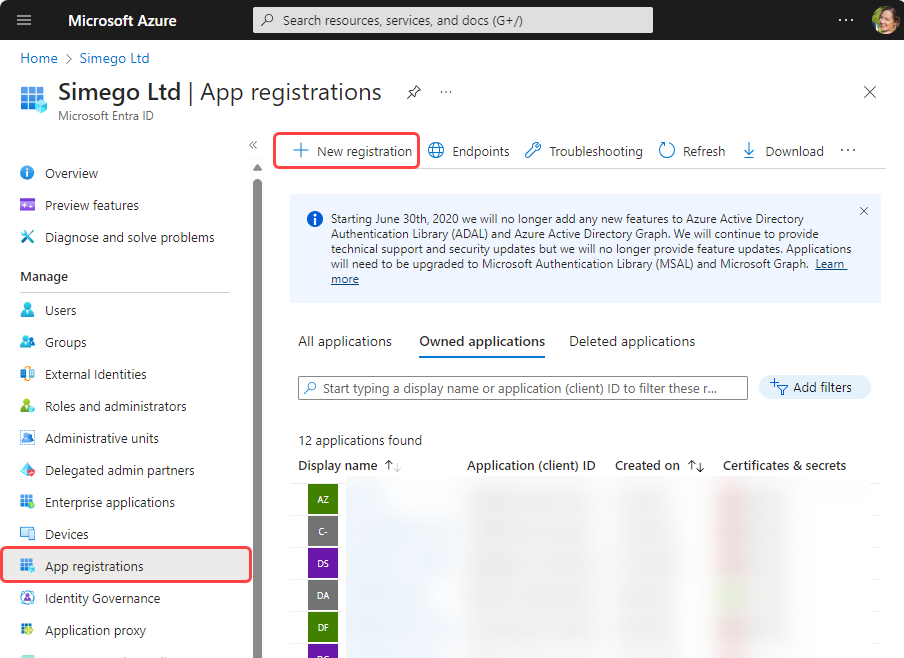
Log in to your Azure account and go to Microsoft Entra ID > App Registrations > New Application Registration.
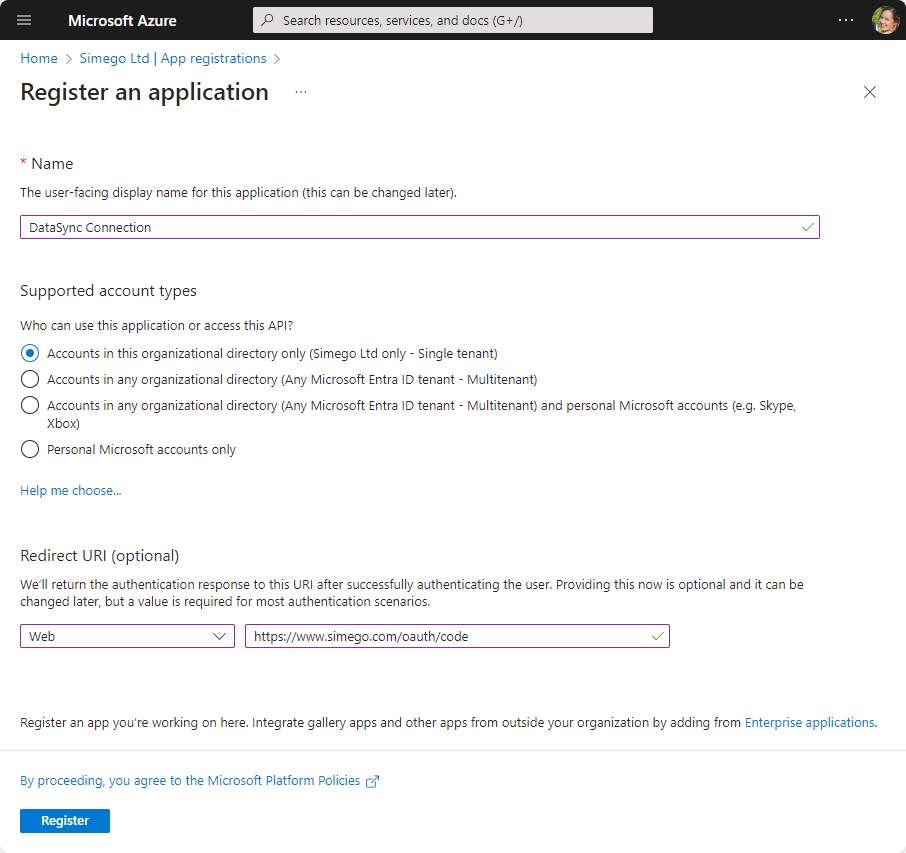
Now enter in a unique name for the application and a redirect URI.
The Redirect URI used in the example below (https://www.simego.com/oauth/code) is defined to allow us to extract the authorisation code from the OAuth handshake. This is used when the OAuth authorisation flow is configured as authorization_code.
Click Register once you are done. This will load the app overview page in your browser.
Set the Permissions
Now we need to set the permission levels we want our application to have. To do this go to API Permissions and click onto Microsoft Graph (1) to edit the permissions.
At a minimum you will need read and write access to any object you want to return or edit, and the offline_access permission. You will need to extend these permissions to match your requirements. Check out the API Documentation from Microsoft to check what permissions you will need to set.
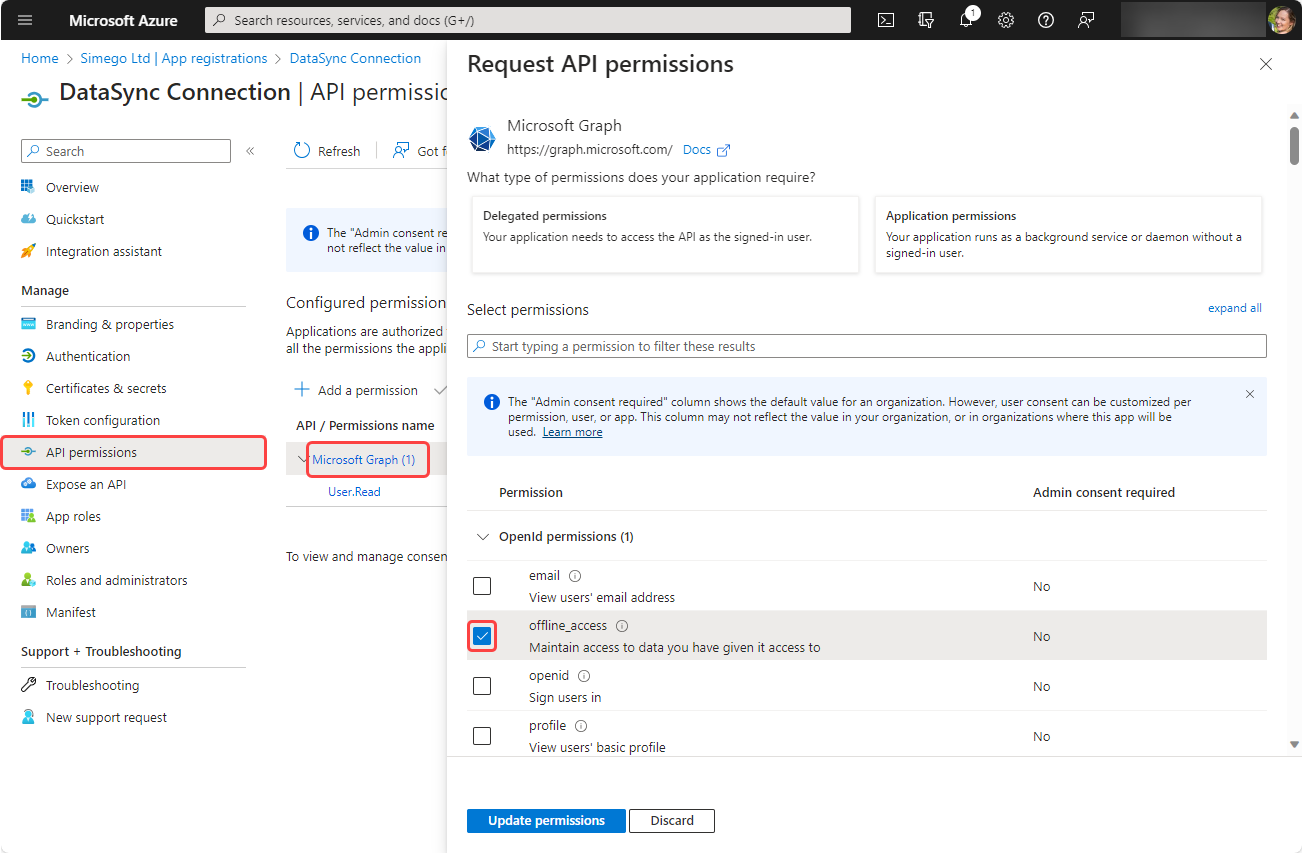
Once you have the permissions you need click Update Permissions to apply them.
If you are not an admin user, you will need to have certain permissions approved by an admin user before you will be able to access those objects.
Get the Client Secret (App Key)
Now we need to get the client secret to do this go to Certificates & Secrets and select New client secret. Then type in a name for the secret, for example DataSync and set an expiry as required. Note that when the secret expires you will need to update your connection in Data Sync. Click Add to add create the secret.
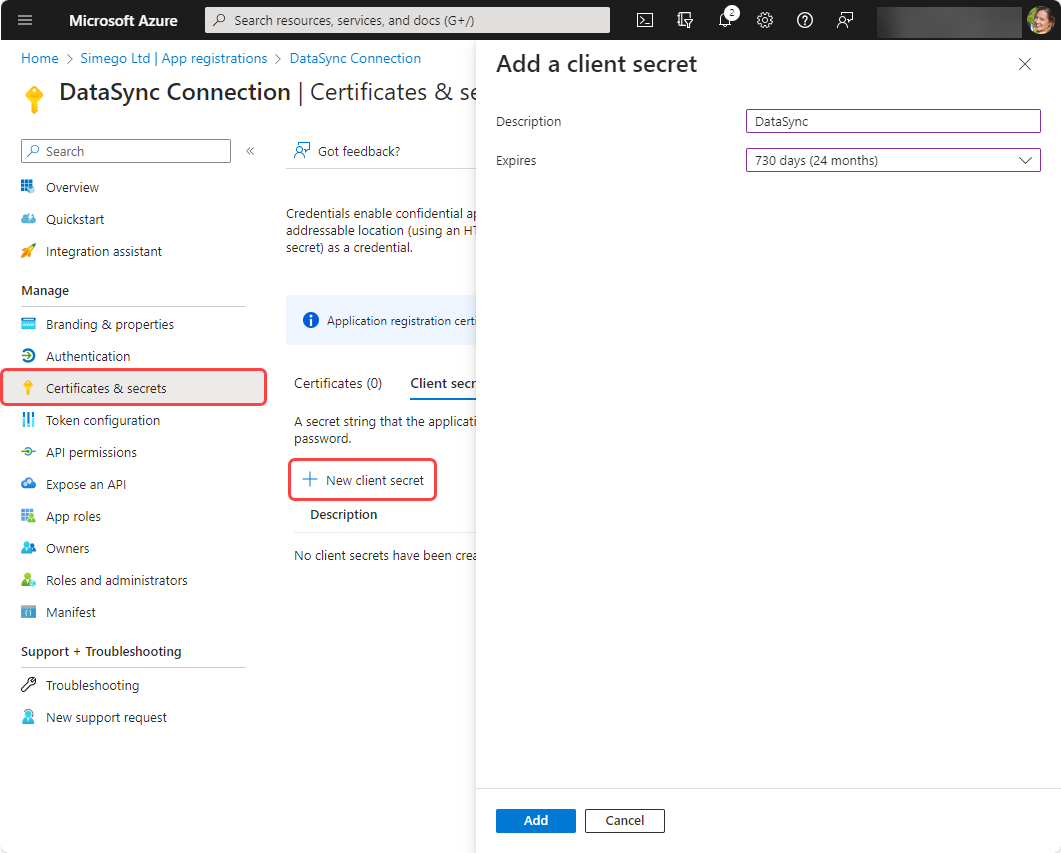
This will then generate your client secret. Make sure to take a copy of the value as it will not be shown again.
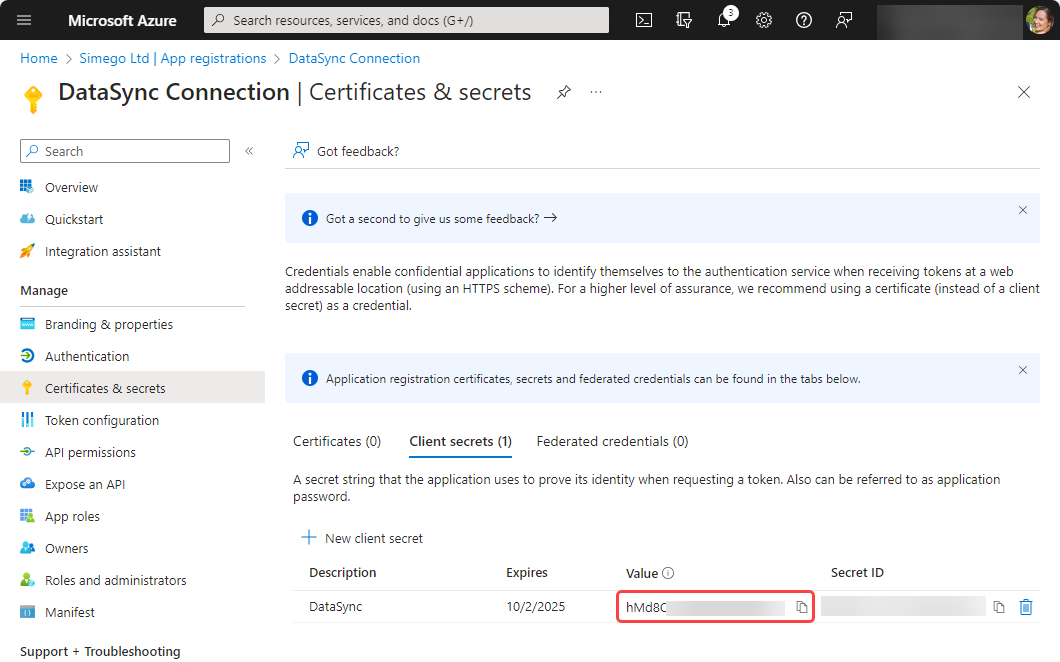
Make sure to make a note of the secret as it will not be shown again. If you loose it you will need to create a new secret.
Gather the Data for the Connection
The information you need to gather for the connection in Data Sync can be found below:
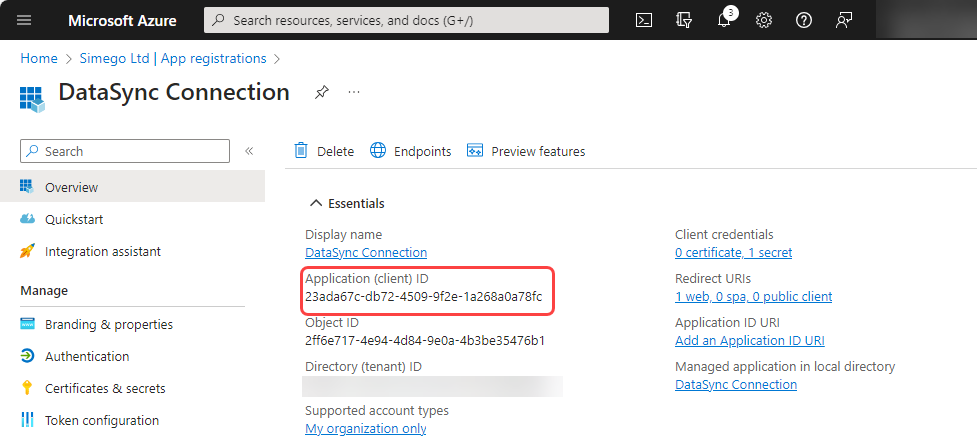
Client ID
You can find this on the overview page of the app. It is also known as the Application ID.
Client Secret
This is the key you created earlier and should have made a copy of.
Token Endpoints
These can be found by clicking onto Endpoints on the app overview page in Azure, and then copying the OAuth 2.0 authorization endpoint (v2) and OAuth 2.0 token endpoint (v2).

Connecting in Data Sync
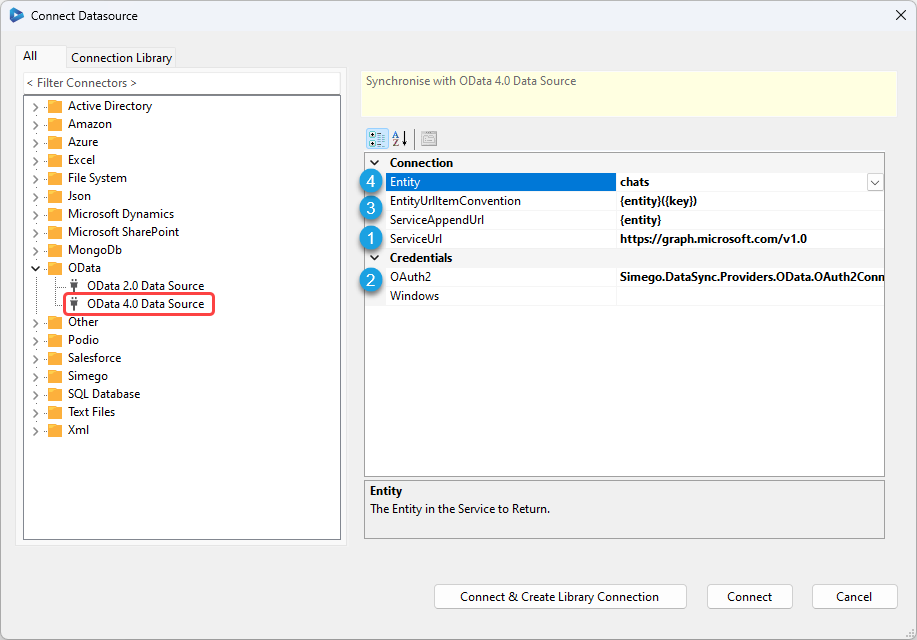
To connect to Azure AD with Data Sync open the connection window, expand the OData folder and select the OData 4.0 Data Source connector.
The image below shows the connection and the numbers correspond to the order the details should be entered. These are described further below:
1 - ServiceURL
The service URL for Graph API will be: https://graph.microsoft.com/v1.0or ```https://graph.microsoft.com/beta``
2 - OAuth2
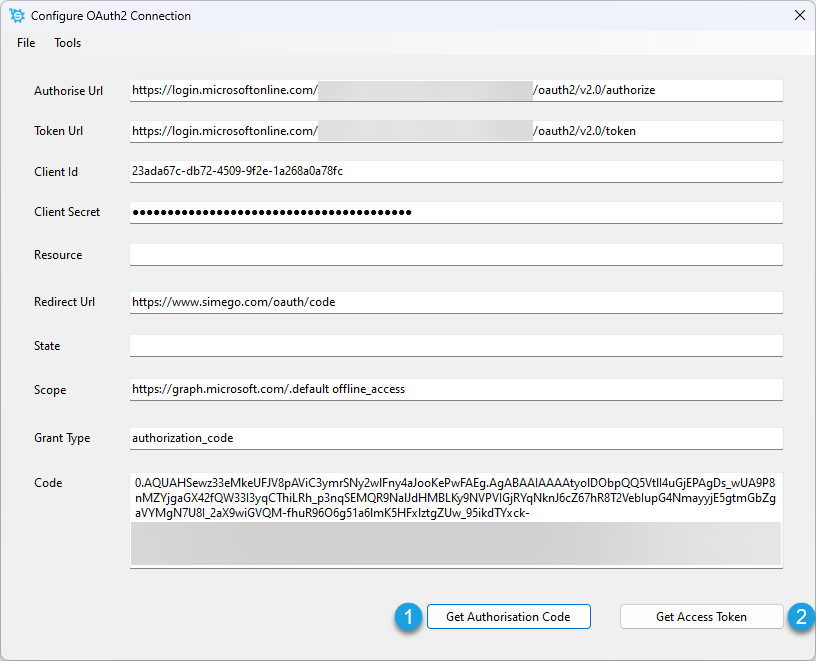
Click on the three dots (ellipsis) to open the connection window, and complete the required fields. Once you are done click Get Authorisation Code to sign in, accept the permissions and return a code. Then click get Access Token to go back to the connection window.
| Field | Value |
|---|---|
| Authorise URL | OAuth 2.0 authorization endpoint (v2) |
| Token URL | OAuth 2.0 token endpoint (v2) |
| Client ID | The Client ID saved earlier |
| Client Secret | The Client Secret saved earlier |
| Resource | Leave blank for V2 endpoints. For V1: https://graph.microsoft.com |
| Redirect URL | Set this to the redirect URI you defined when creating the app |
| State | Set to be blank |
| Scope | Set to https://graph.microsoft.com/.default offline_access for V2 endpoints. Leave blank for V1 endpoints. |
| Grant Type | authorization_code |
3 - EntityURLItemConvention
Set this to be {entity}/{key} for Azure AD.
4 - Entity
Finally choose your entity from the drop down.
Click Connect & Create Library Connection to save your connection to the connection library. This will allow you to re-use this connection in other projects without having to reconfigure it.
Troubleshooting
If you are having permission errors i.e. the error widow states 'Permission Denied' you will need to go back to your App and add permissions. Make sure to reopen your saved connection and click Get Authorisation Code under the OAuth2 section of the window. This will refresh your connection and apply the permissions.
If you are not an admin user, you may not have permission to view the objects you are trying to view. If you are trying to access your contacts for example you can add me/{entity} to the ServiceAppendURL property in the property window.